
Home page
It just got easier to protect sensitive data in Jira Cloud
Share on socials

It just got even easier to protect sensitive data in Jira Cloud with Protected Custom Fields

Georges Petrequin
Georges Petrequin
Published on 2 October 2026
8 min read
An illustrated Jira board with a selection of work items overlaid on top, some of which have masked custom fields, as well as a padlock and a check mark.
Georges Petrequin
Georges Petrequin
Published on 2 October 2026
8 min read
Jump to section
What's new: import your existing data into protected fields
How the import feature works
Step 1: Create your protected custom field
Step 2: Import your values into Protected Custom Fields
Option A: If your data is already in Jira Cloud
Option B: If your data is in a CSV
Step 3: Check who can see what
Step 4: Clear or retire the original field

You can now import values from your existing custom fields in Jira or from a CSV straight into Protected Custom Fields. Here's how to secure your sensitive data, step by step.

Jira Cloud has no native way to restrict who can see information in an individual field. If someone can open a work item, they can see the sensitive details stored in any field on that work item.
Protected Custom Fields, our free app for Jira Cloud, closes that gap. You create a protected custom field and choose the user groups who can access it. Values in that protected field are encrypted with AES-256, and only those user groups can reveal them. Other team members can still view and collaborate on the work item, but they can't see the protected value.
Since releasing the app, we've heard the same question crop up a few times now: what about the sensitive data we already have in Jira?
You have all sorts of sensitive data already in Jira. Salaries, contract values, confidential intellectual property, and customer details, all sitting in Jira custom fields where anyone can read them, if they have access to the space (formerly a project). You might be working around this with complicated permission schemes or duplicate spaces, but this comes with a heavy collaboration tax.

What's new: import your existing data into protected fields

To help you speed up the process of moving existing information into your protected fields, we built a new import tool into Protected Custom Fields.
You can now copy values from your existing Jira fields, or import values from a CSV, straight into your protected fields automatically. Here’s how.

Already using the app? Approve the update first

This new import tool is part of a major version update, so you'll need to manually update the app.
Find Protected Custom Fields in your Jira admin settings under manage apps, and approve the update. Until then, the app will stay on the previous version and the import options won't appear.

How the import feature works

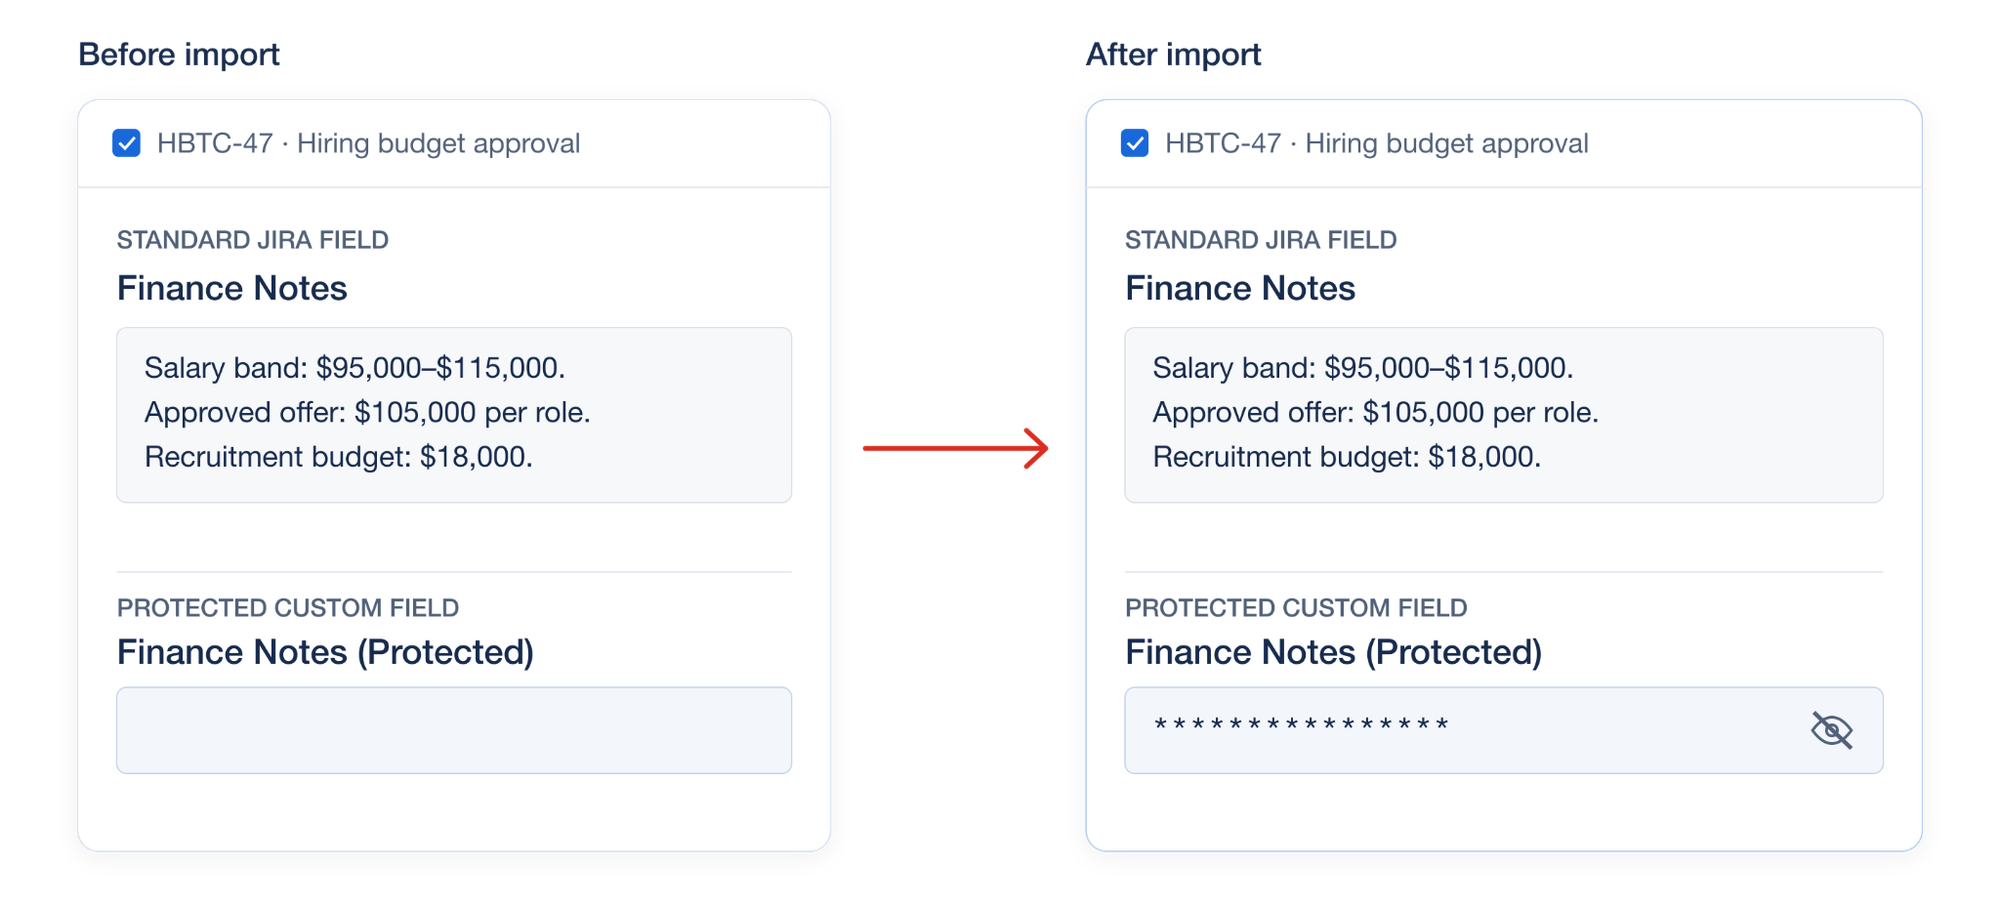
The import feature copies your values from a Jira field into a new protected custom field.
An example of how Protected Custom Fields copies values into a new protected custom field without deleting the previous field
Say your team records your hiring budgets and approved salary range for new candidates in a native custom field called 'Finance Notes'. You can now copy those notes into a protected single-line text custom field called 'Finance Notes (Protected)'.
Anyone in the Jira user groups you assign to the destination field can reveal and edit the values in the protected field. Everyone else can still open the work item as normal, but they can’t reveal the protected value.
Keep in mind that even though this process protects the new fields, the original values stay in the source field until you clear them or retire the field, so make a plan to remove or retire those old fields.
An illustration showing the before and after of cleaning up duplicated fields
Until you remove them, anyone with access to the work item will have access to the original field.

Step 1: Create your protected custom field

First, you need to create the protected destination field. Protected Custom Fields supports single-line text, multi-line text, and number custom fields.
Create a protected field of the same type as the field you're importing from, then assign the user groups that should have access.
For this example, we'll use a protected single-line text custom field because our finance notes contain salary amounts alongside other budget details. If this were a real Jira Cloud instance, we'd want to restrict access to this field to groups such as HR, payroll, or finance.
If you haven't created a protected custom field yet, our field-level security guide walks through setup and permissions.

Step 2: Import your values into fields created by Protected Custom Fields

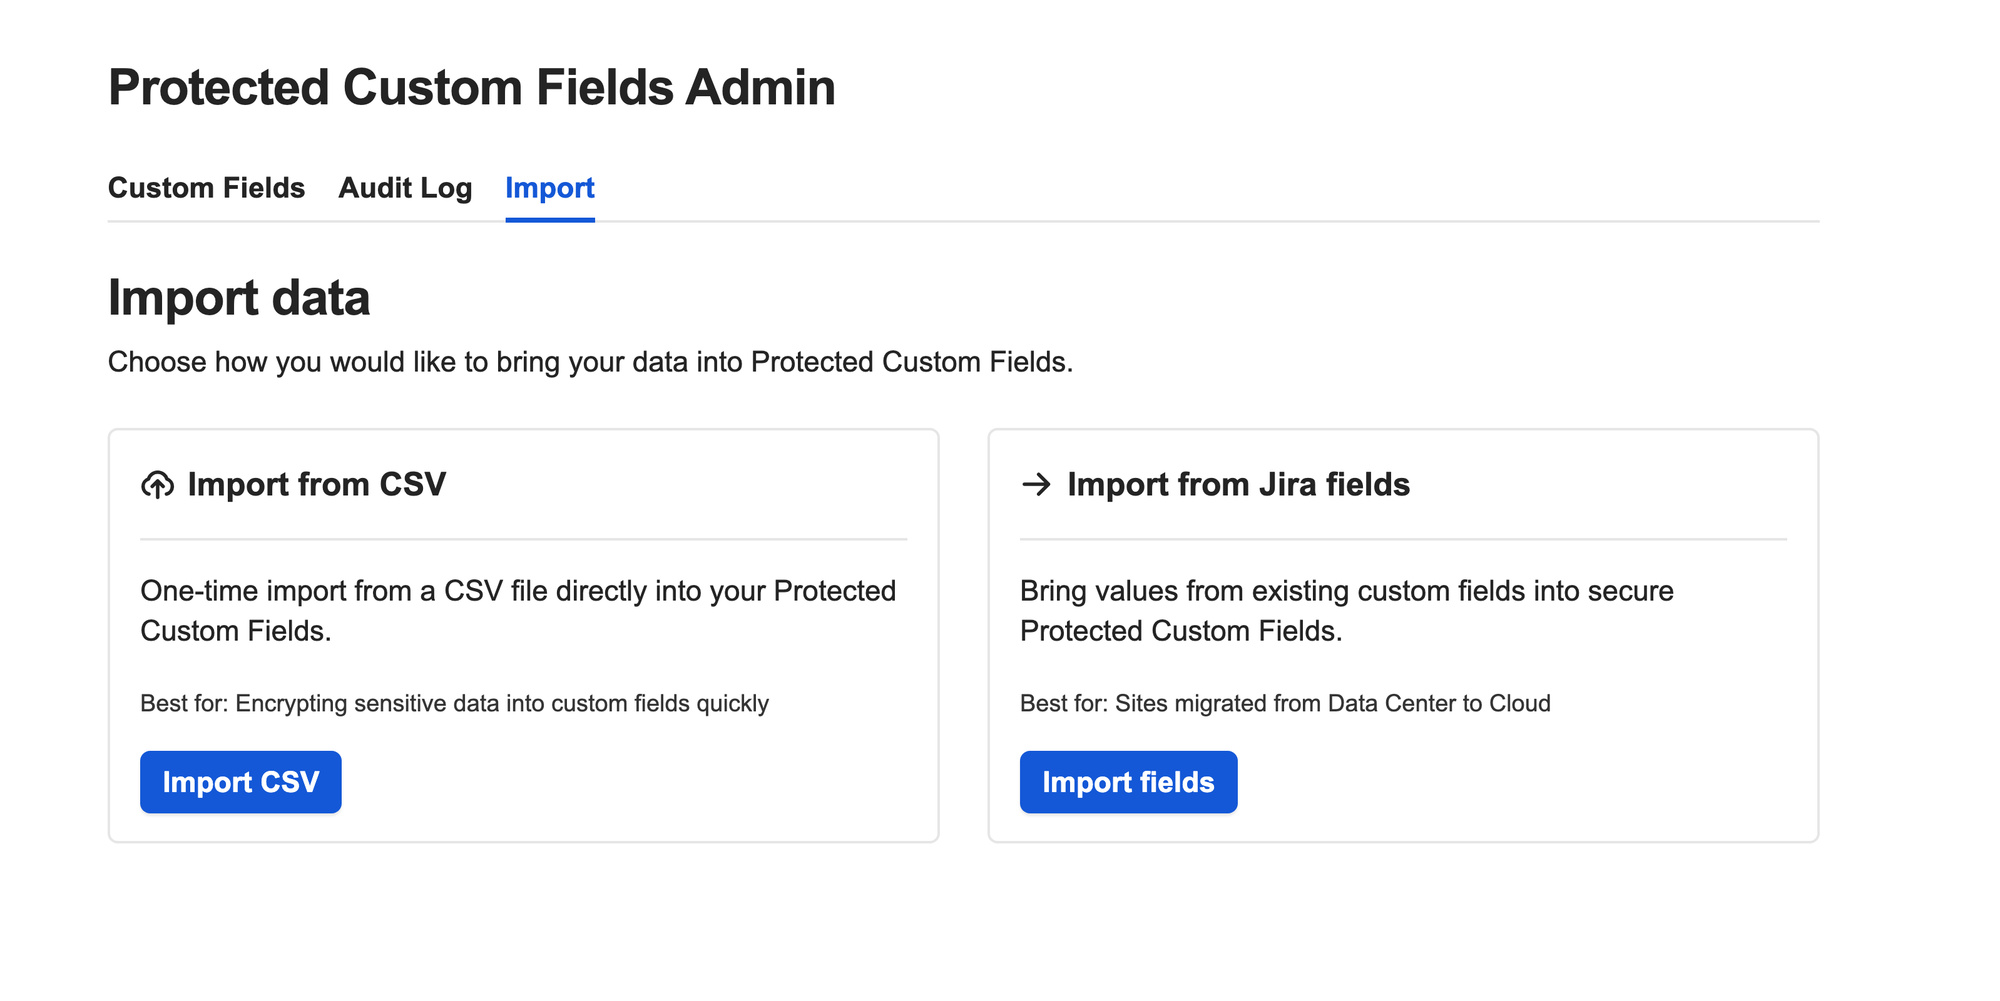
There are two ways to import your information into new secure fields, created with Protected Custom Fields.
You can import data that's already in your native Jira fields, or you can upload a CSV.
The import section of the Protected Custom Fields app for Jira Cloud

Option A: If your data is already in Jira Cloud fields

If the values are already in your Jira Cloud instance, use the 'Import from Jira fields' option.
Three things to know before starting:
  • You can't map two separate source fields into the same protected field.
  • You can import any field type that would map well into a number, single-line text, or multi-line text custom field.
  • You can't use an existing protected custom field as a source. It needs to be a regular Jira field, which can either be a regular custom field or a standard Jira field.
Here's the process:
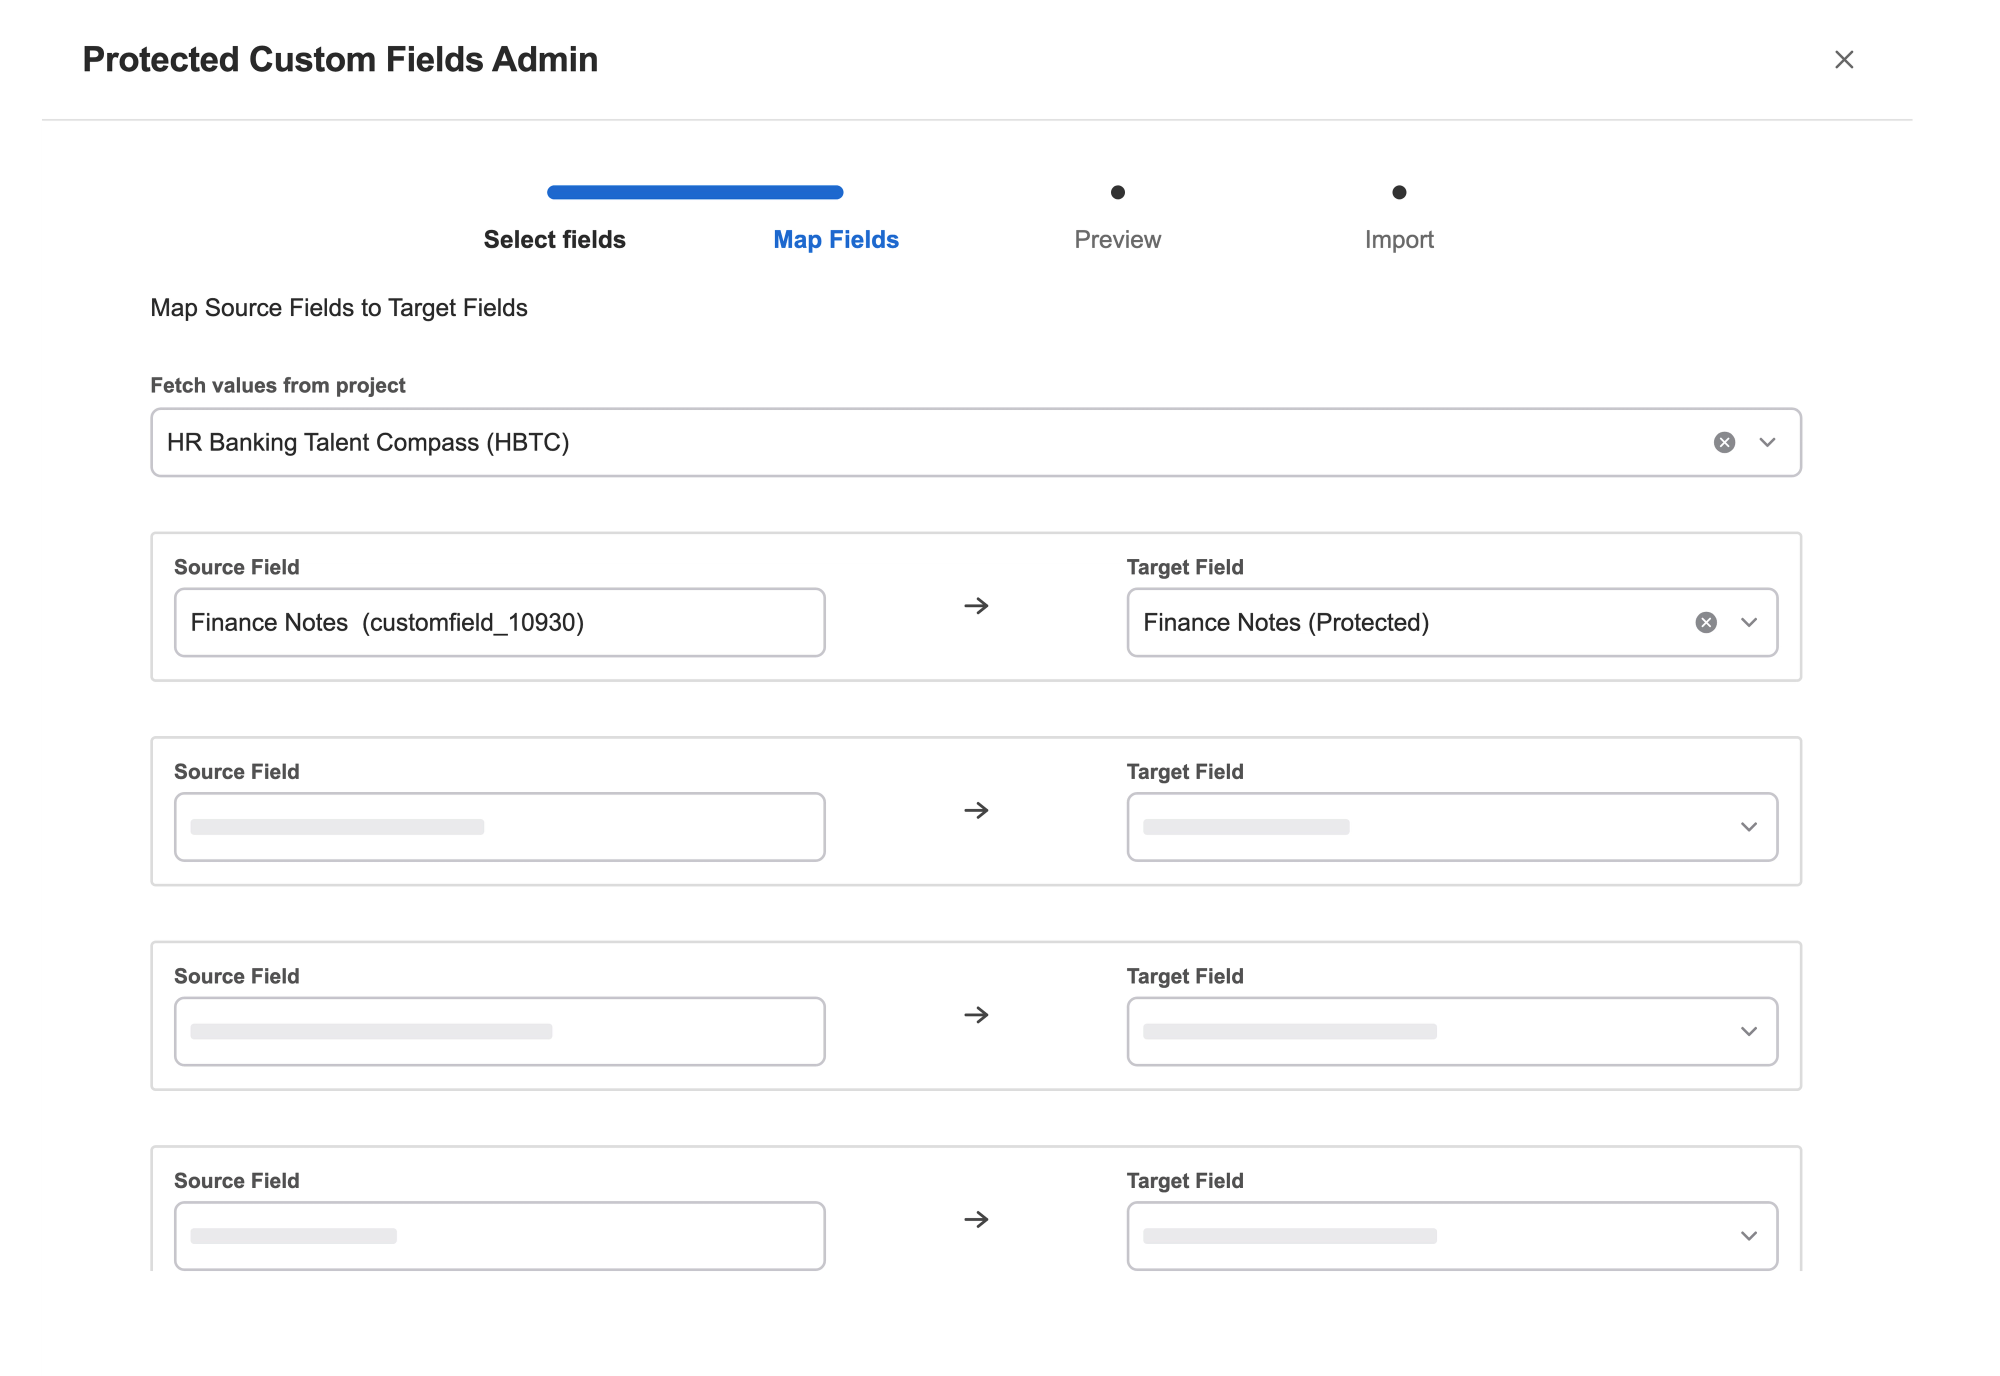
1. Open the import tab and select the space that holds your source data.
2. You'll see a list of the existing fields in that space. A dropdown next to each one will list the available protected custom fields that you can map your native Jira fields to. For our example, that's Finance Notes being mapped to Finance Notes (Protected).
A screenshot of the Protected Custom Fields field mapping process during the import
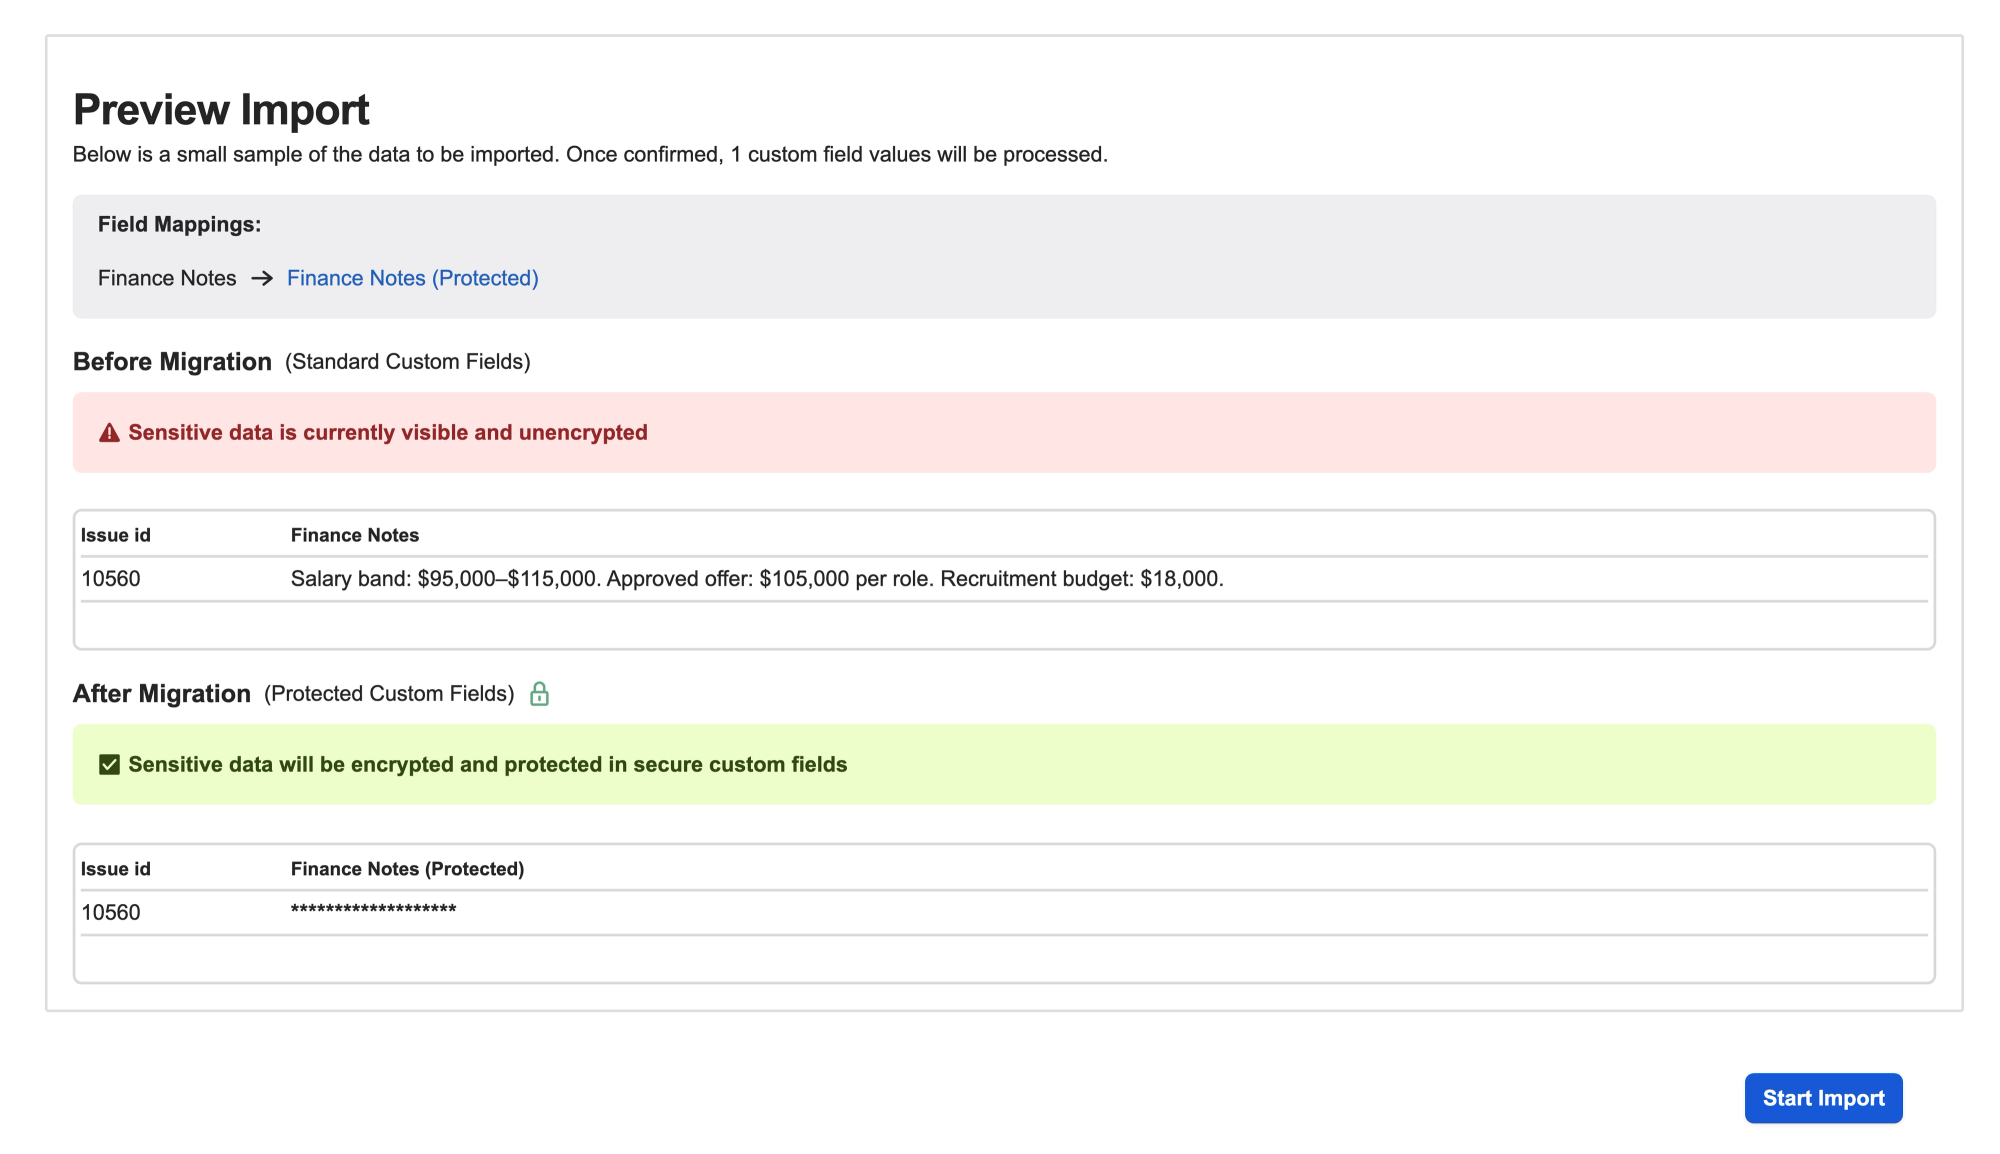
3. The preview tab then shows you the values being imported from each existing field, and the protected field they're going to.
The Protected Custom Fields import preview screen
4. If everything looks good, run the import.

Option B: If your data is stored in a CSV

If your values aren't in your Jira instance yet, you can import them from a CSV. This is useful if you're moving data from one Cloud instance into another, or, if you have a more complex Data Center to Cloud migration where you don’t want your information to ever land in regular Jira Cloud custom fields.
The CSV needs an Issue ID column with the ID of each work item on the site you're importing into. If your values come from another Jira instance, those IDs will be different, so export the work items from this site first (using Export CSV → All fields) and add your values to that file.
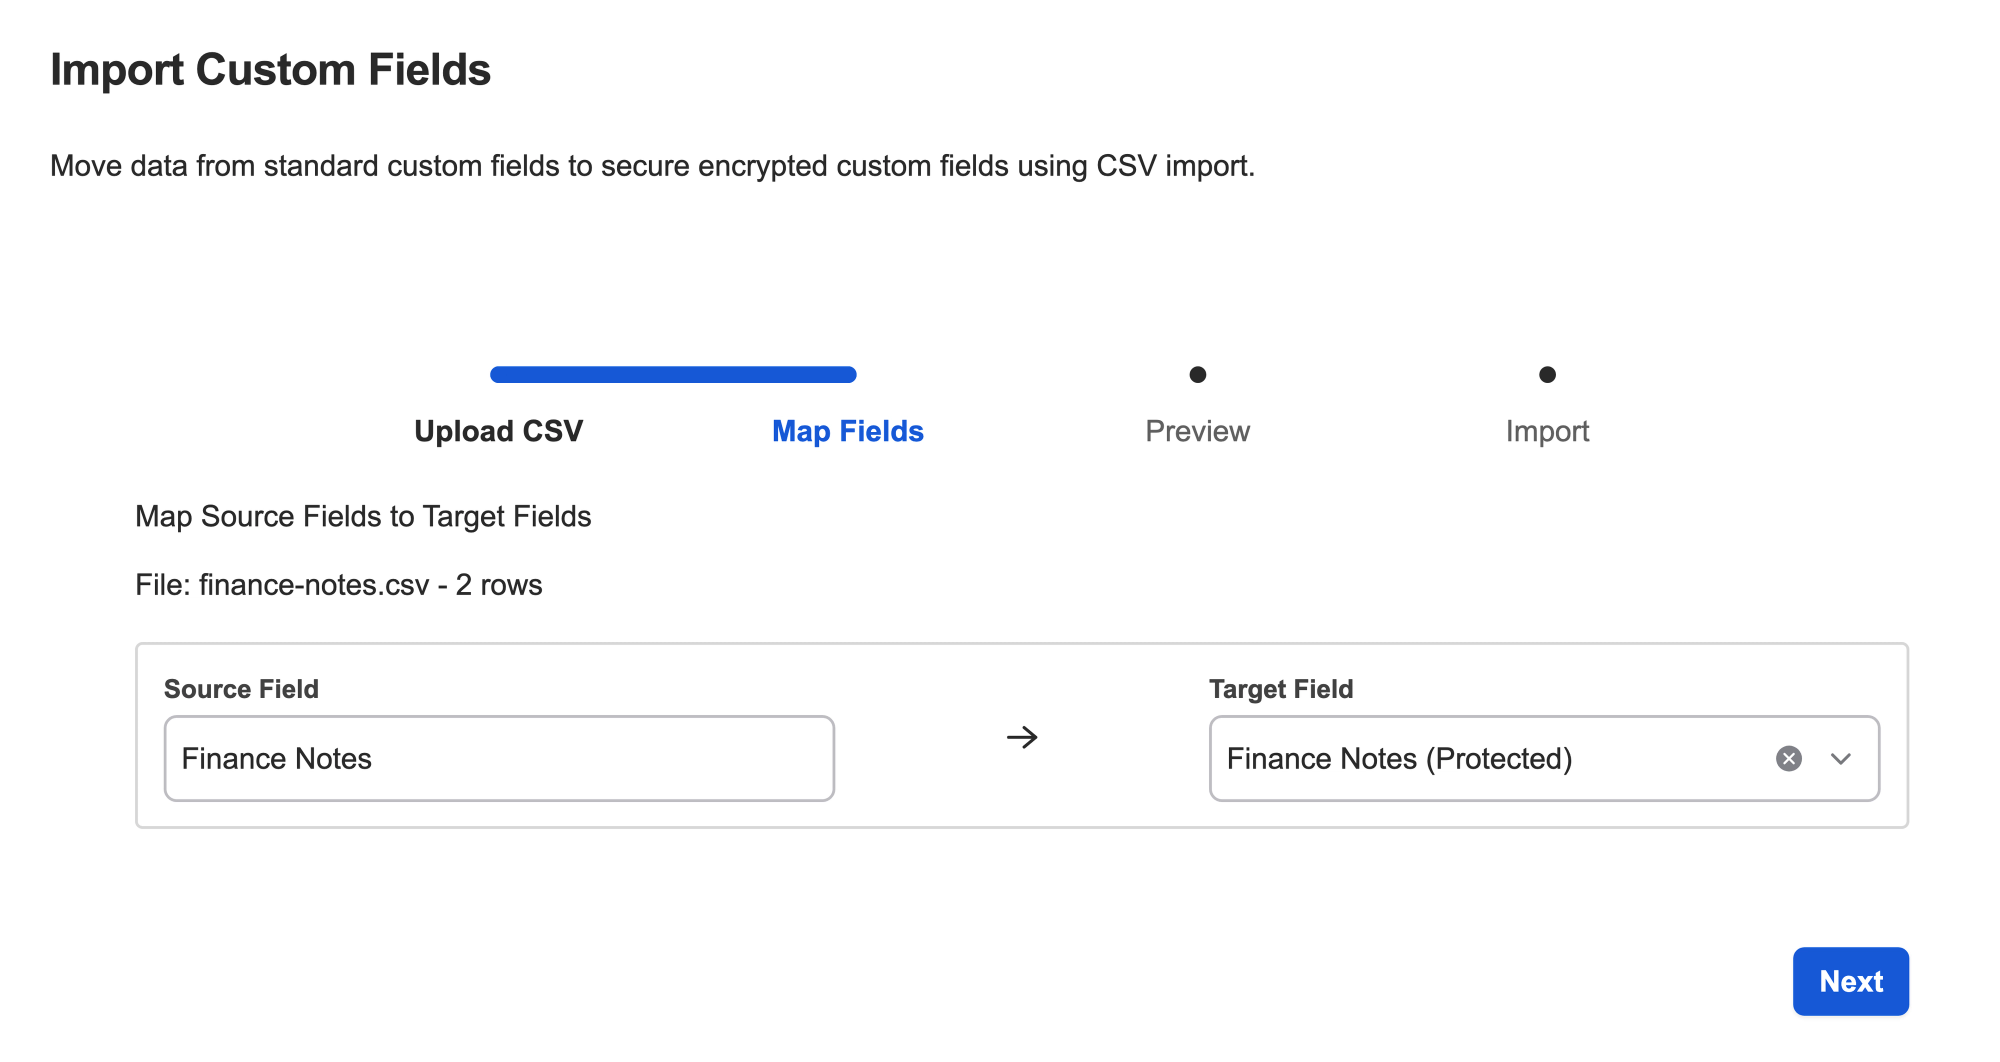
Upload your CSV file and map its columns to your protected destination fields.
Mapping imported fields from a CSV to new protected custom fields
Check the preview, and when you're happy, run the import. Your values will land directly in your new protected custom fields! It's worth noting that from the moment these land in the new protected fields, they'll only be viewable to people in user groups with access.

Step 3: Check who can see what

Open a few of the affected work items and confirm the values landed in the right protected fields. Then check access with two accounts:
  • Someone in an authorised group should be able to reveal and edit the protected value.
  • Someone outside those groups should still be able to open the work item without revealing the value.
A screenshot of a Jira work item showing the way in which an authorised user can reveal a protected custom field
An authorised user can click the eye icon to reveal the protected value and check its contents.

Step 4: Clear or retire the original field

The import process leaves your source field in place, still visible to anyone who can see the work item.
Once you're confident that you have everything you need in your new protected fields, you can now clear the values or retire the field.
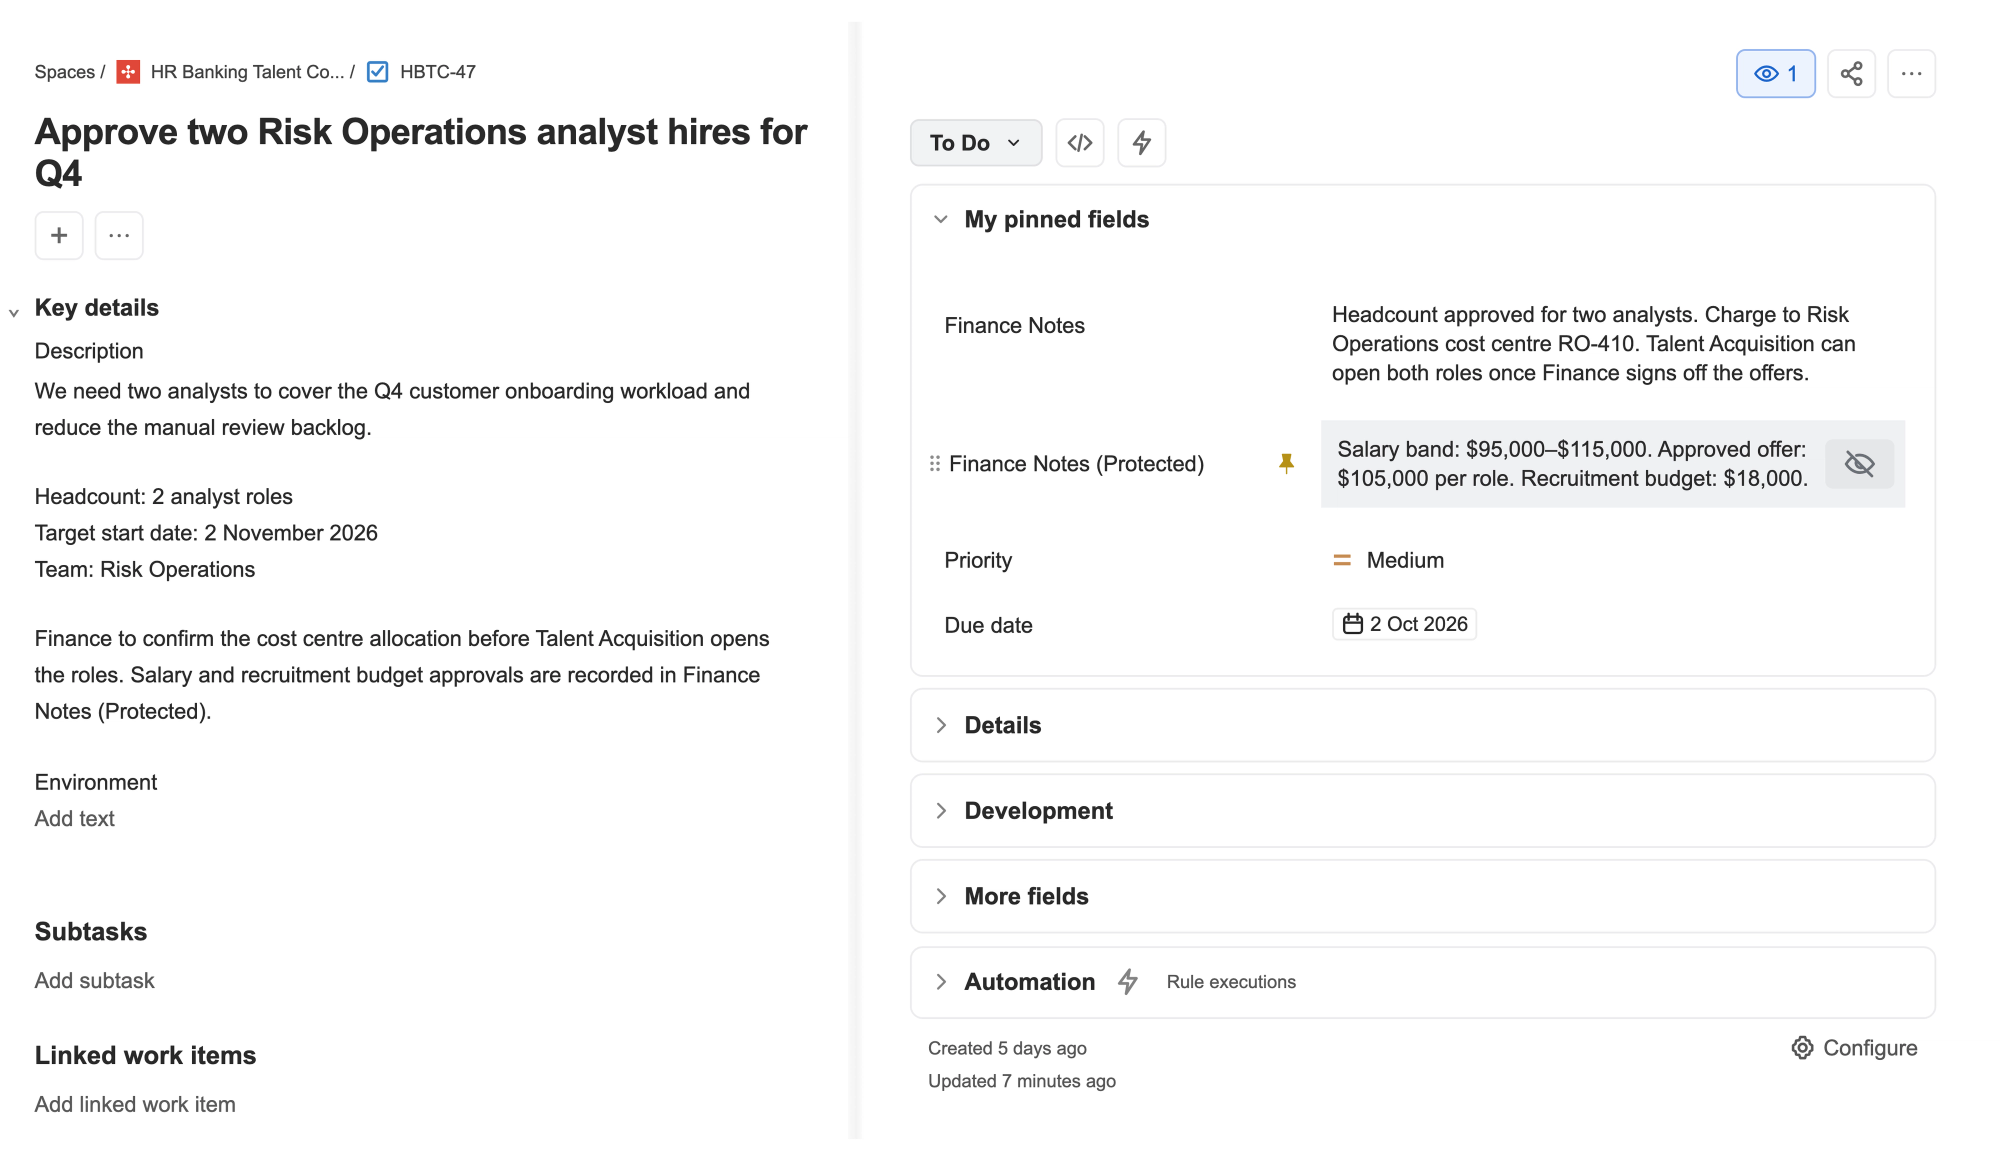
Now that you've secured the sensitive information within a protected field, your team can keep general hiring updates visible in the work item, while salary and budget details are visible only to people in authorised user groups.
Here, the regular Finance Notes custom field holds the headcount approval, cost centre and next steps for Talent Acquisition.
Priority and the approval due date are visible alongside it, with Finance Notes (Protected) holding the salary band, approved offer, and recruitment budget.
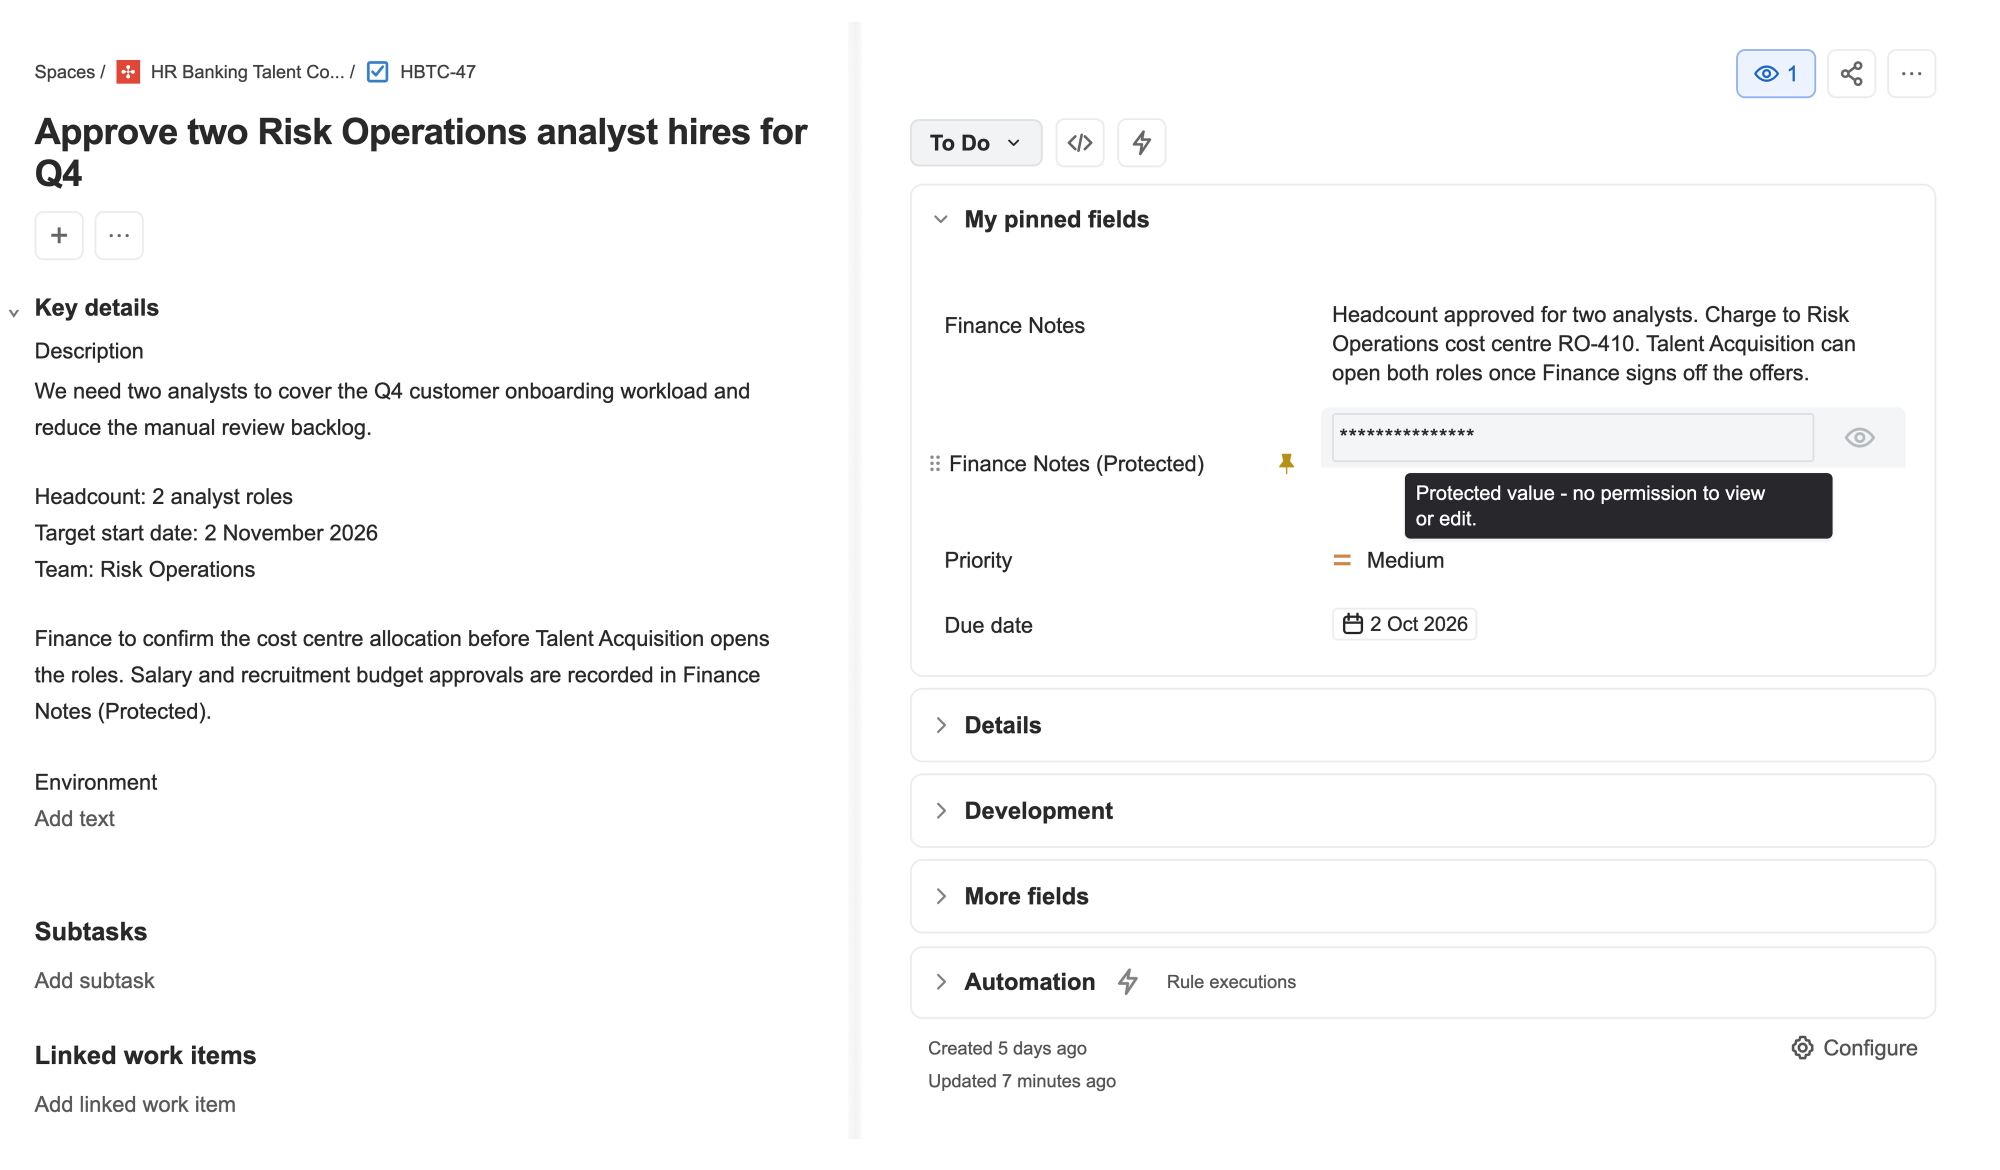
A protected custom field staying hidden for users without permissions
Sensitive information stays visible only to those with the right permissions, without having to duplicate a space or devise a workaround to prevent unauthorised access to salary details.

Start small: try it with one field

Create a protected destination field, assign the user groups who will have access, and run the import on one small space. Then, check that your values all landed in the right spot. If so, you're ready to run a larger import!
Need another field type or hit a problem with your setup? Let us know!

Ready to add field-level security to your Jira Cloud instance?

Protected Custom Fields is free on the Atlassian Marketplace. Already using it? Approve the latest update to unlock the import, and get in touch if you need a hand!
Written by
Georges Petrequin
Georges Petrequin
Content Marketing Manager
Georges is a Content Marketing Manager at Upscale with a focus on our Jira apps. He spends his time crafting content that helps our customers solve their everyday work pain points and get more out of their Atlassian tools.
Jira
Cloud