How to create a custom project structure in Jira
Share on socials
How to build a custom Jira structure and bring clarity to your complex projects: step-by-step guide


Jump to Section
Jump to section
What is the default work type structure in Jira?
Signs that your team has outgrown Jira's built-in structure
Two ways teams extend Jira's structure to fit their workflow
How to build your custom Jira work item structure (step by step)
1. Link your work items together
2. Install Hierarchy for Jira
3. Get clarity into your task dependencies with a nested tree view
4. Tailor what you see in your Jira work type structure
5. Save custom project views for every stakeholder need
6. Reduce your time spent on reporting
Key takeaways
When your workflow outgrows Jira's default structure, things get messy. Learn how a custom setup can bring clarity, improve reporting, and keep your projects on track.
You might be growing fast and need extra hierarchy levels above epics and stories. Or perhaps you're simply exploring better ways to organise your Jira projects and report on progress. Either scenario leads to the same question: is there a more effective way to structure your work?
In this guide, you'll learn how to structure your Jira work type hierarchy to fit your team's unique workflow, going beyond Jira's default capabilities.
By the end, you'll be ready to implement your new project structure and enjoy the benefits of a project management workflow that truly fits your way of working, delivers clearer reporting, and helps your team focus on their most important work.
What is the default work type structure in Jira?
Jira's default work type hierarchy (previously referred to as 'issue hierarchy') has three levels:
- Epics: your big-picture, strategic goals.
- Stories: work that supports the epic.
- Sub-tasks: step-by-step tasks focused on execution.
This structure works well for many teams because it mirrors how development work naturally breaks down: balancing strategic goals with day-to-day execution. But, this three-tier setup has limits, especially in larger organisations with complex project management needs.
If you're here, it's probably because you've hit those limits already.
Signs that your team has outgrown Jira's built-in structure
Jira's default epic > story > sub-task hierarchy works well for most projects. Epics are broken down into stories, and stories are broken down into sub-tasks. Your team can logically structure your work in the most efficient way.
However, some teams need to push the limits. As your teams and projects grow, you may need additional hierarchy levels to keep you organised:
- Teams implementing portfolio management need levels above epics, such as initiatives or themes.
- Feature-driven teams want to insert 'feature' levels between epics and stories, so sprint-sized work isn't forced into a story.
- Teams using the Scaled Agile Framework (SAFe) introduce multiple extra levels (Capability, Program Epic, Solution Epic…) that don't map to Jira's default structure.
Without support for extra levels in Jira's work type structure, teams resort to workarounds like:
- Renaming epics as 'features' to expand the hierarchy can work, but it creates terminology confusion and can break reports that expect 'epic'.
- Using labels or components to group work, but these lack the hierarchical relationships required for extra functionality, like calculating project progress.
- Customising your structure and manually implementing the changes across multiple boards, leading to admin overhead and a risk of inconsistencies.
- If you're in an industry with strict compliance rules, these workarounds introduce a risk of inconsistencies in your processes, which could quickly evolve into a major problem.
In short? These workarounds often require trade-offs that aren't worth it.
Two ways teams extend Jira's structure to fit their workflow
If you don't want to use workarounds, there are two proven options available: both with their pros and cons.
Option 1: Jira Cloud Premium with Jira Plans
If you're already paying for Jira Cloud Premium, then you can use the Jira Plans feature (previously known as Advanced Roadmaps). The advanced planning feature in Plans lets you add extra levels above the epic level, such as initiatives or features. You can then view these on a portfolio-style roadmap.
The downside? You can only add new levels above epics.

Jira Plans allows you to add levels above epic.
There's also no visual tree view that combines your built-in and new levels, so you'll need to jump between the roadmap and work item views.
That said, if you already use Jira Cloud Premium and just need extra levels above Epics, Plans with advanced planning is a great fit.
Option 2: Hierarchy for Jira
The second option is to use our purpose-built app, Hierarchy for Jira.
Instead of forcing you into a specific project structure, Hierarchy for Jira uses straightforward parent/child links, so you can place additional hierarchy levels anywhere you need: above, between, or beneath existing work items.
Add new hierarchy levels anywhere you need to with Hierarchy for Jira.
You can see relationships between work items in a nested tree view, roll-up or sum-up Story Points, and even save custom hierarchy views for different stakeholders.
The app is free for teams of ten or fewer users, and costs a fraction of Jira Cloud Premium.
Bottom line: if you only need one extra level above Epics and already pay for Jira Premium, Plans may be enough for you. But, if you need complete flexibility over your Jira hierarchy without the price tag that comes with Jira Cloud Premium, then Hierarchy for Jira has you covered.
How to build your custom Jira work item structure (step by step)
1. Set a strong foundation by linking your work items together
First, it's time to make sure your work items are correctly linked together.
You've probably already been linking your work items together, and if so, then you can skip this step!
If you haven't been linking your work items together, then it's a simple process:
1. Open any work item and select 'Link work items'. You can create a brand new link or link your existing work items.
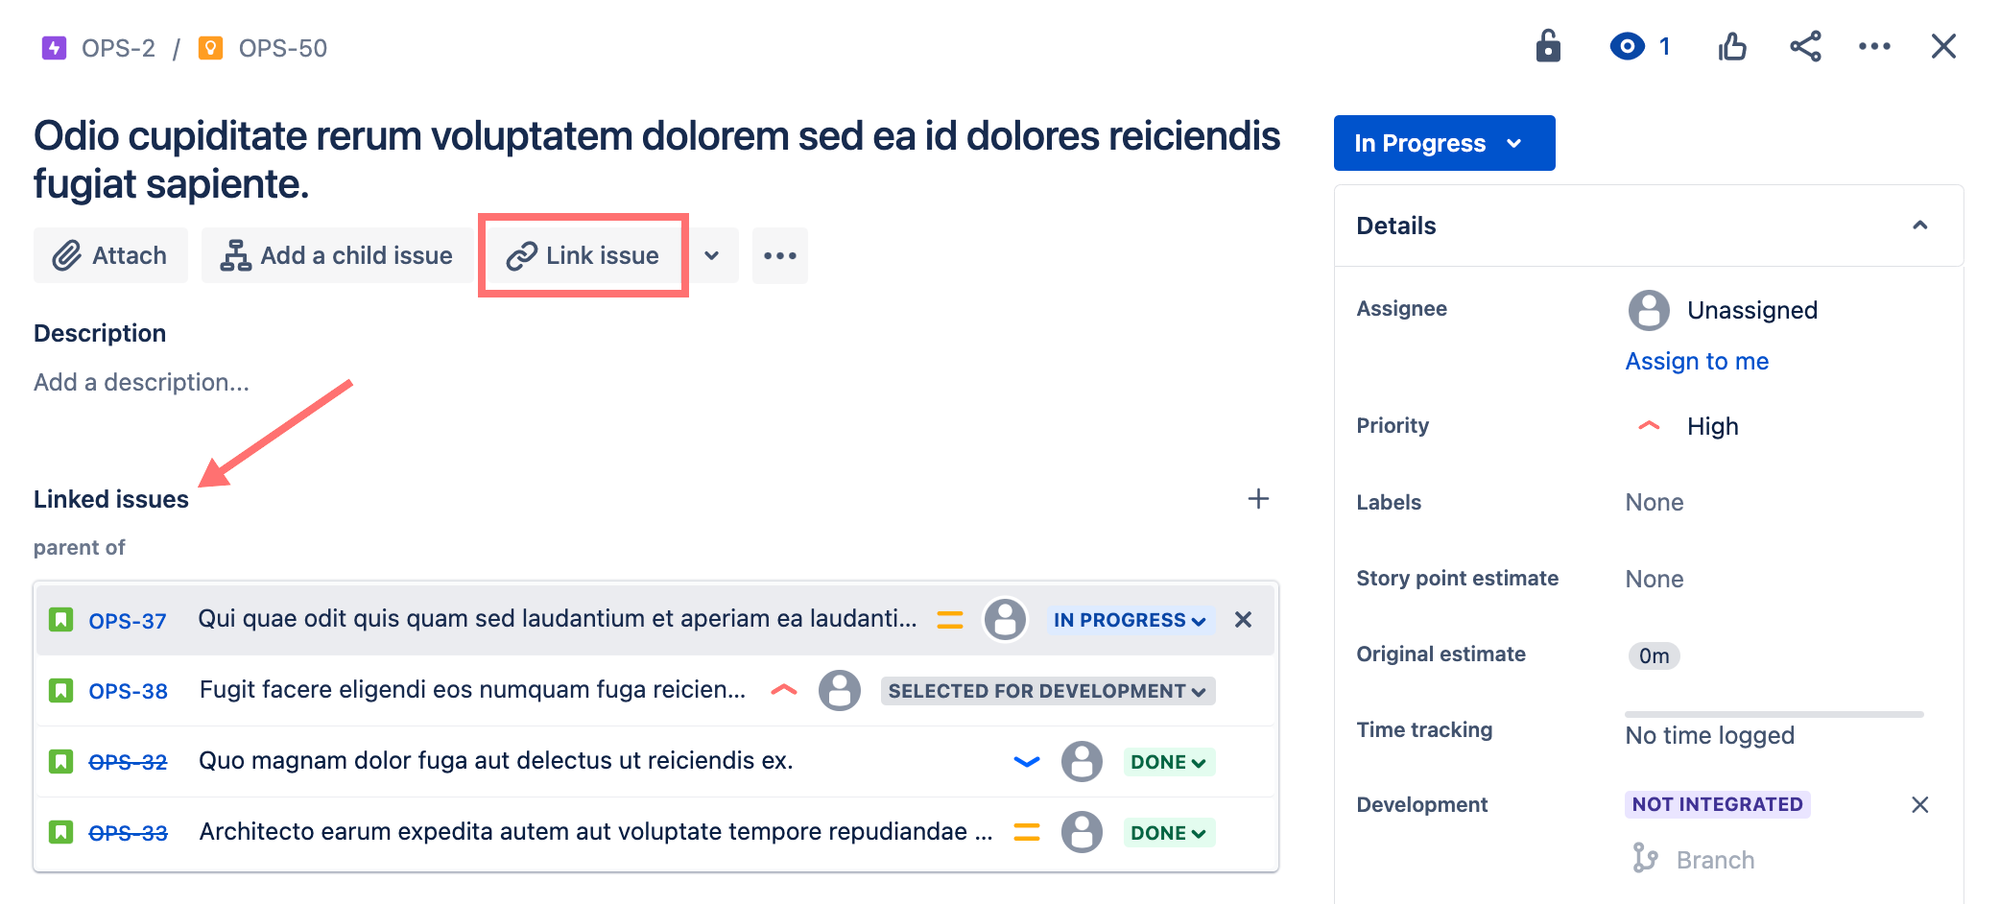
Link any work item together.
2. Choose the link type (e.g., 'relates to', 'is blocked by'), and that's it!
Once your work items are correctly linked, it's time to visualise your new project structure.
2. Install Hierarchy for Jira (30-day free trial available)
To start using your custom work item structure, install Hierarchy for Jira via the Atlassian Marketplace.
There's a completely free 30-day trial, so you can try the app risk-free and see if it works for your unique project needs.
There's no complicated installation process and no time-consuming or forced onboarding calls. Hierarchy for Jira connects to your projects and works out-of-the-box.
3. Get clarity into your task dependencies with a tree view and timeline
After installing the app, you can open Hierarchy for Jira from the apps section of your Jira sidebar. Hierarchy for Jira will immediately generate a visual custom hierarchy containing all of your linked work items and how they relate.
In the default Jira view, you'd only see one level of linked work items: for example, if you opened TIS-196 in the example below, you would see that TIS-205 blocks it. But, you wouldn't see that TIS-205 is blocked by TIS-206.
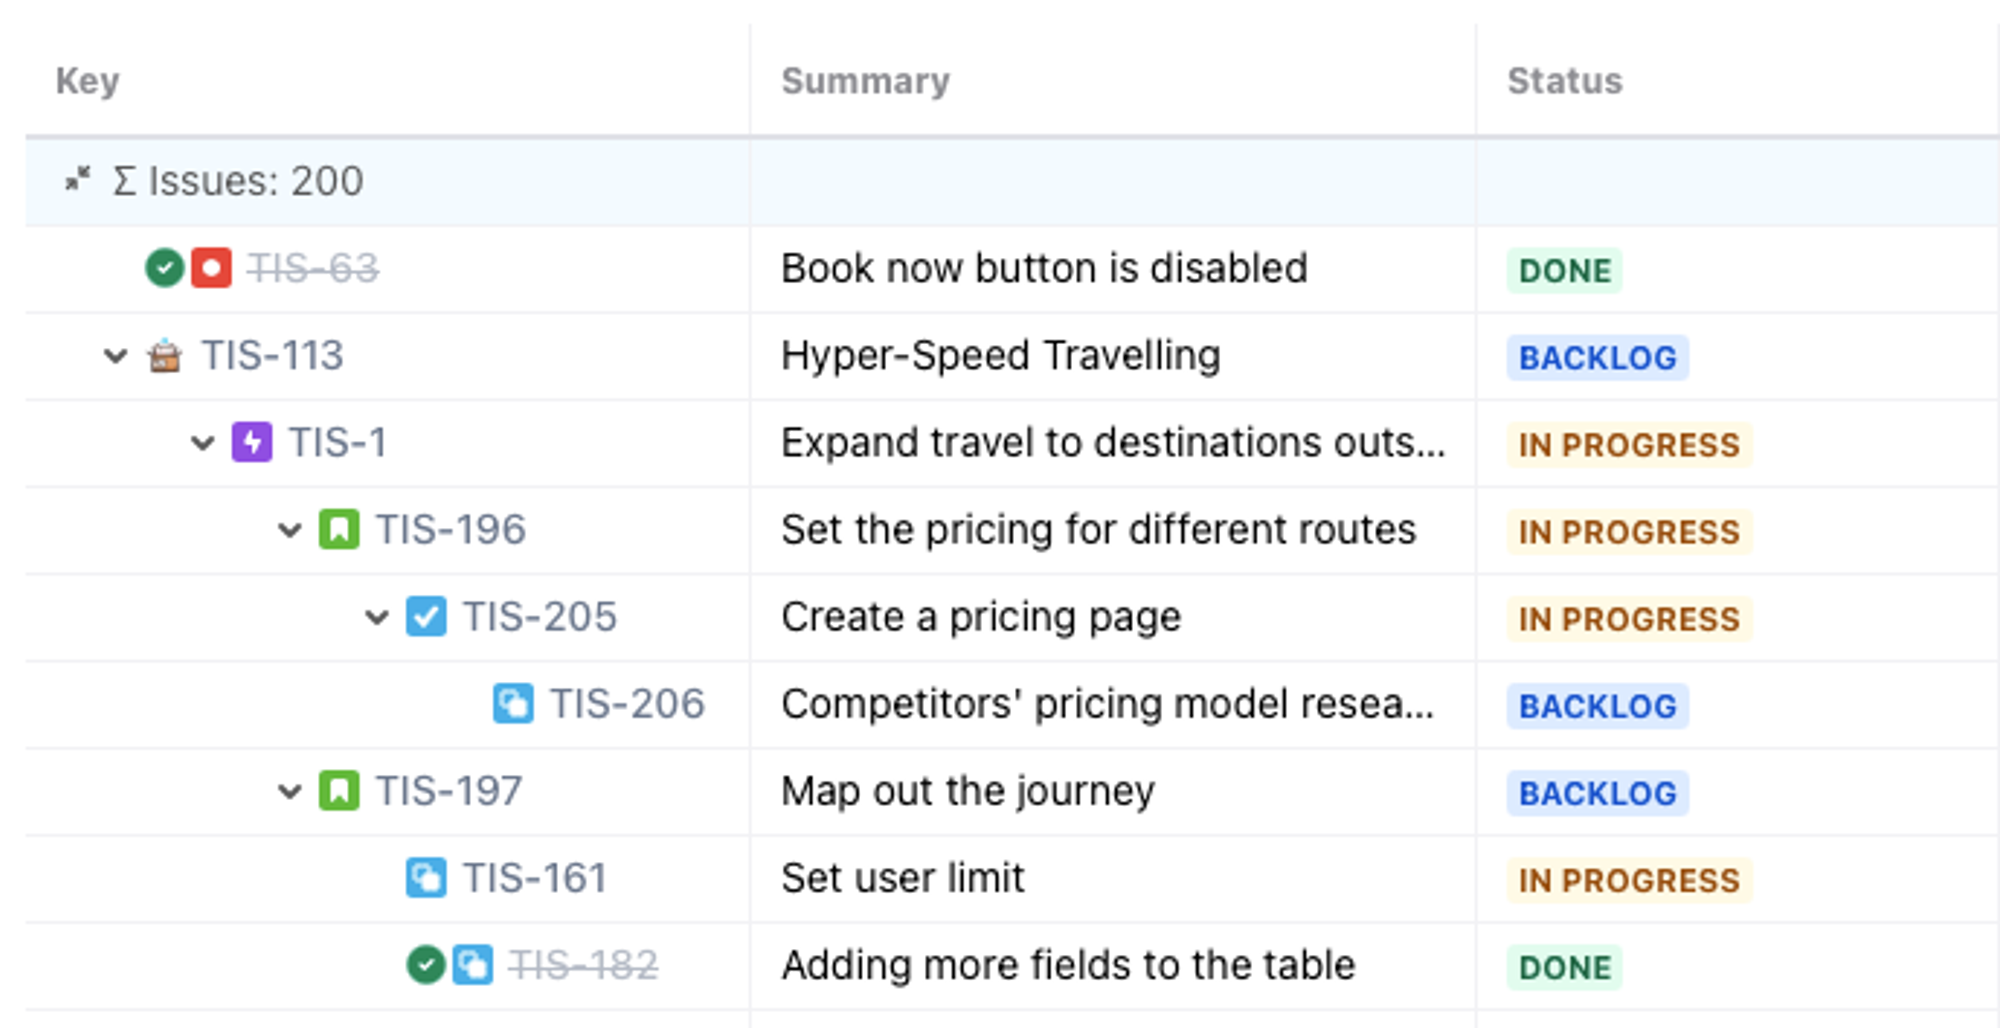
Use Hierarchy for Jira to visualise your full chain of task dependencies in one view.
With Hierarchy for Jira, you'll now be able to see your whole chain of linked work items, immediately identifying all task dependencies in your project.
Imagine you're managing the refactoring of a payment gateway for a SaaS platform.
If the project is stalling, in the past, the project manager (PM) would need to ask multiple team members for a status update to find out what's going on.
With Hierarchy for Jira, the PM can open the tree view and instantly see that the 'Migrate to Stripe' task is blocked because the 'PIC-DSS audit' still hasn't been marked as complete.
The PIC-DSS audit is key to moving forward with the new payment gateway, and the PM can delegate work away from the team focused on the audit to ensure they can prioritise it.
For a schedule-focused view, you can switch to Hierarchy for Jira's timeline view, which displays your work items on a Gantt-style timeline.
Dependencies appear as lines connecting work items, making scheduling conflicts immediately visible. You'll also see why there's a conflict when you hover over the dependency line.
See the dependencies in your interactive timeline view
If deadlines need to shift, simply drag the timeline bar, and the underlying Jira work item updates instantly!
4. Tailor what you see in your Jira work type structure depending on your priorities
A large project can have hundreds or even thousands of individual work items, and you don't need to see them all at once.
To focus on any specific set of work items, you can use the Tree Configuration tool to filter which work items you see.
For example, you could filter your view to only show work items that link together with a 'Depends on' dependency, or you could group your work items by the team member they're assigned to.
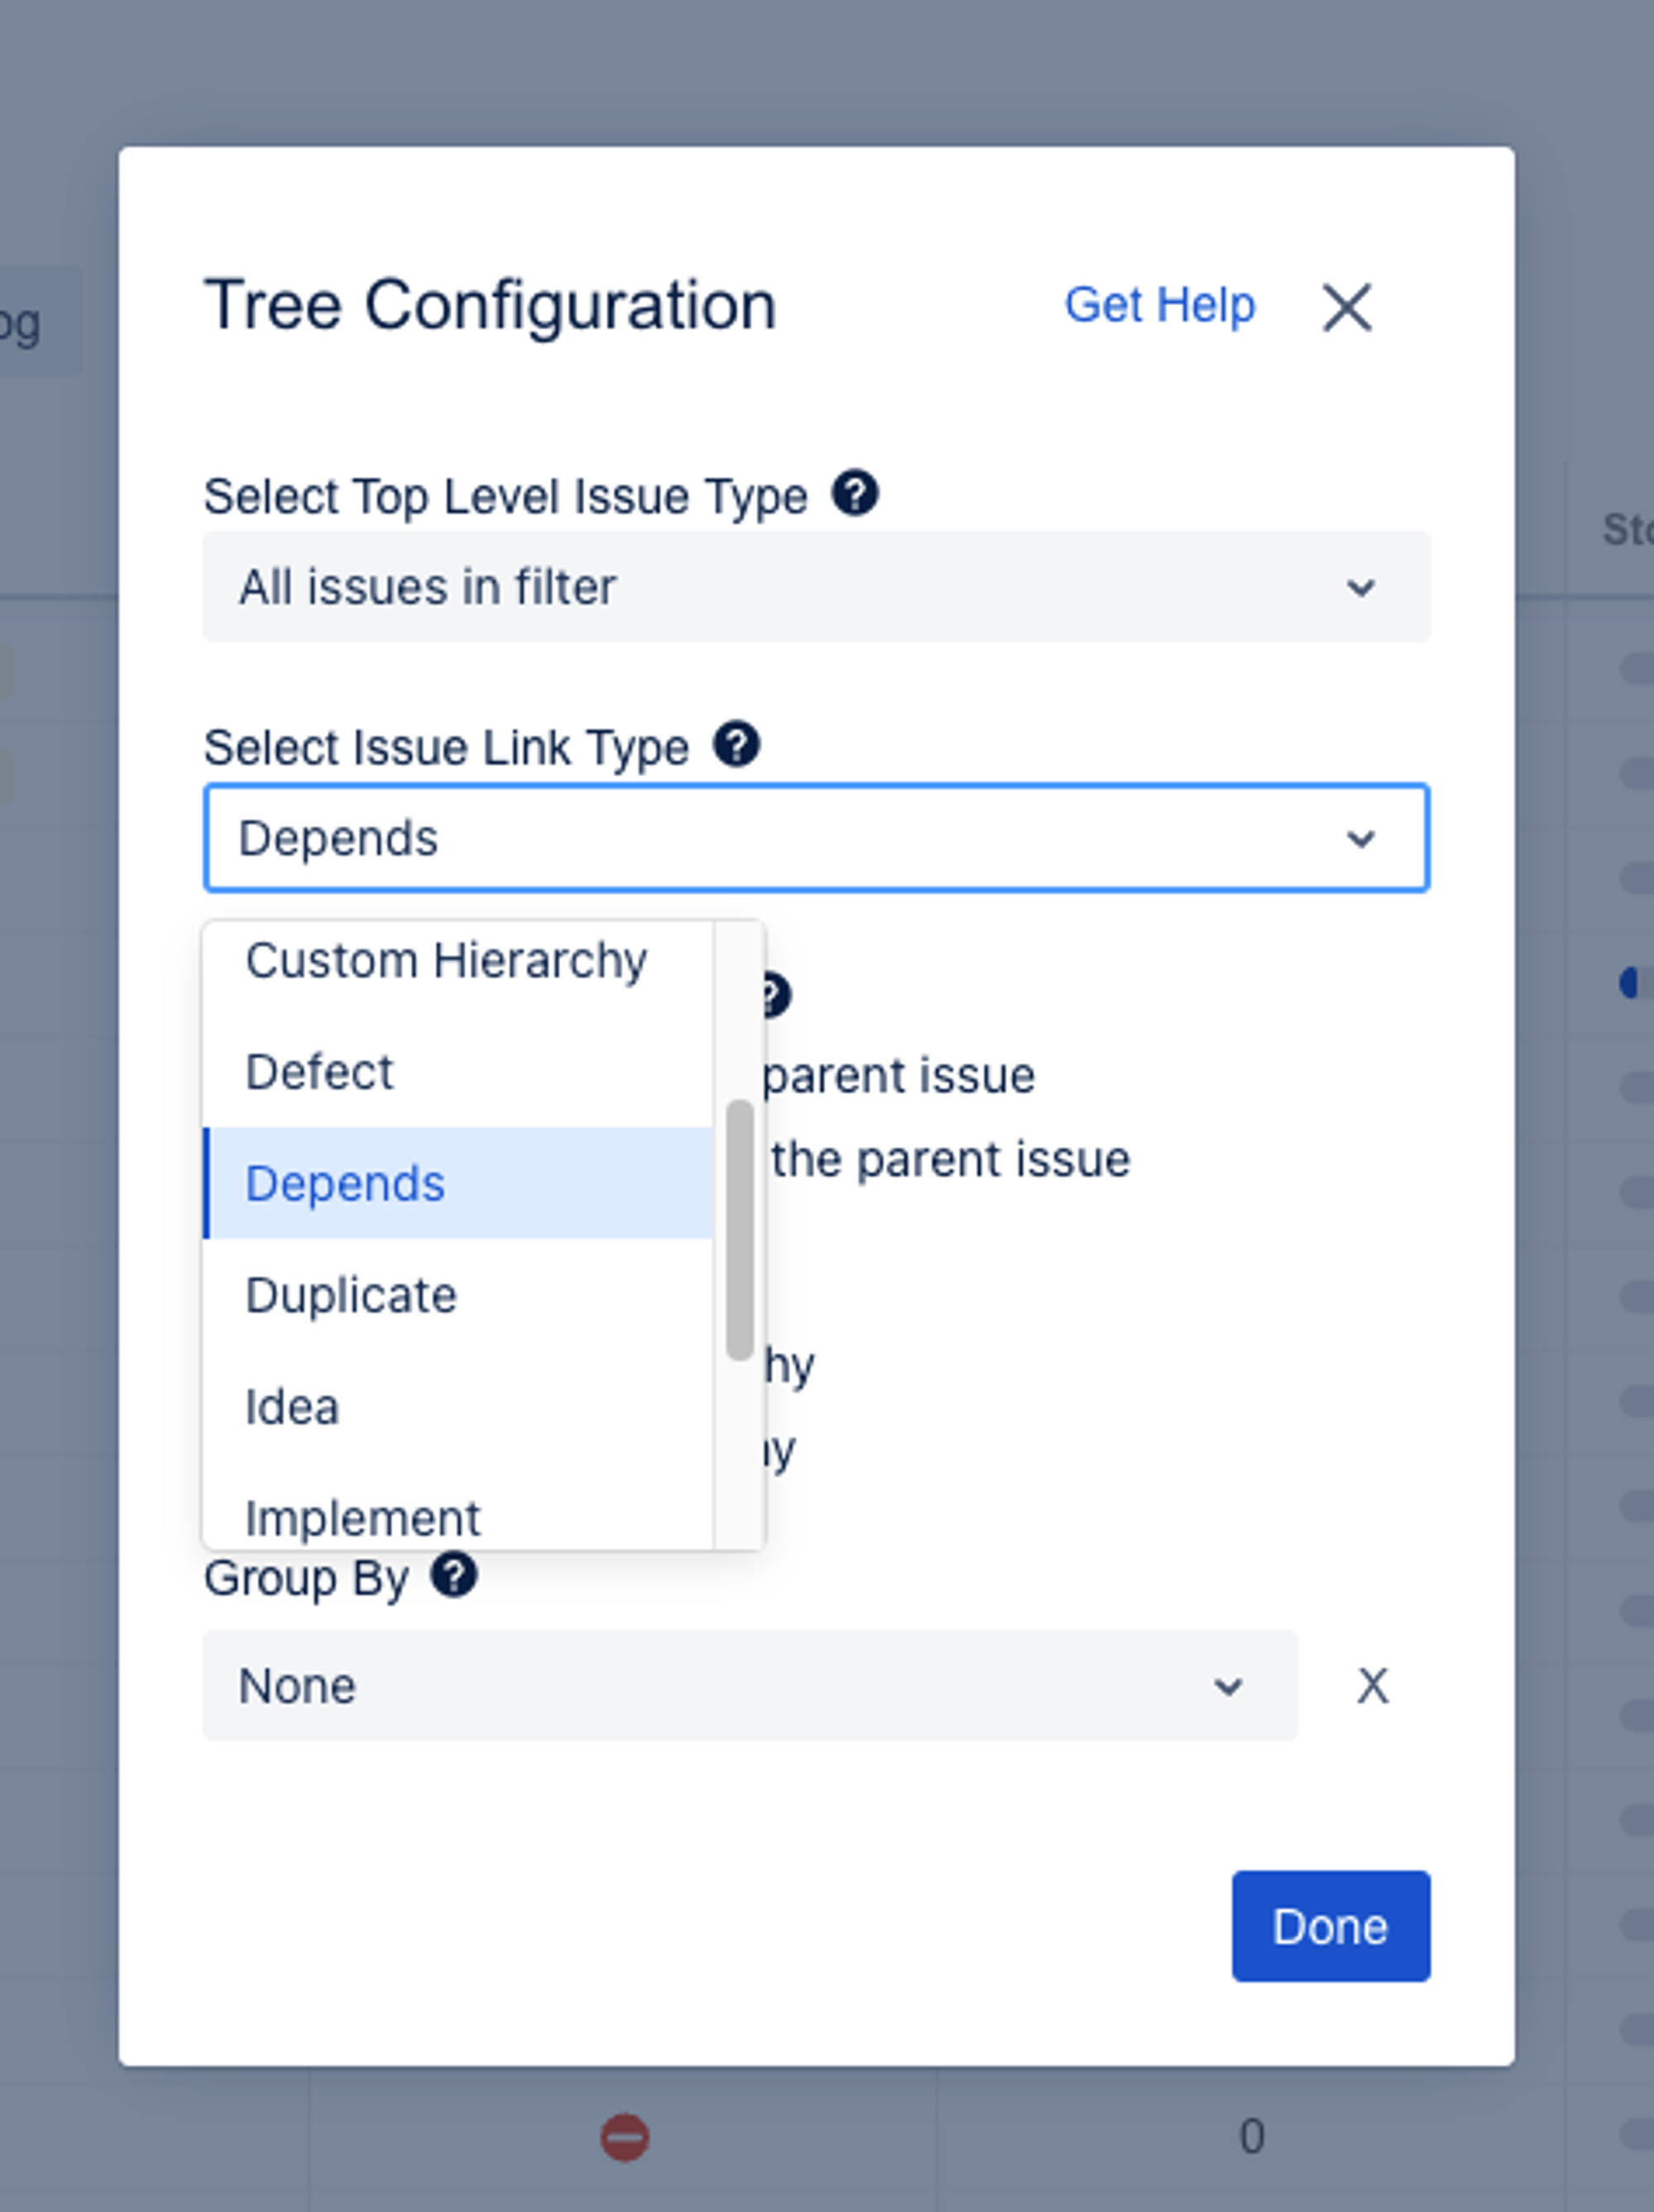
Select the dependency type to sort your work item structure by.
The flexibility over how you view your project structure gives project managers complete visibility into everything happening in your project.
In practice, here's a way to use it: imagine your marketing team uses Jira to plan a new product launch. You can filter your project to only show 'Launch content' with 'Depends' dependencies. Then, group your work items by the assignee or owner.
You can then identify the tasks blocking the launch and who is responsible for them. This makes it easy for you, as the project lead, to unblock essential tasks and ensure that every key milestone is hit on time.
The newfound clarity means you'll proactively map out and identify key task dependencies and surface hidden blockers before they derail your timelines, and keep every team member laser‑focused on the work that moves the project forward.
5. Create custom Saved Views to personalise the information in your hierarchy
Every project manager knows you need to report progress differently based on who you're talking to.
With Hierarchy for Jira, you can easily create reports focused on any part of your project with Quick Filters. You can use JQL to pull in items from multiple projects, and customise the work items shown in your new view.
Once you've dialled in an ideal project view, click 'Save view' and give it a name.
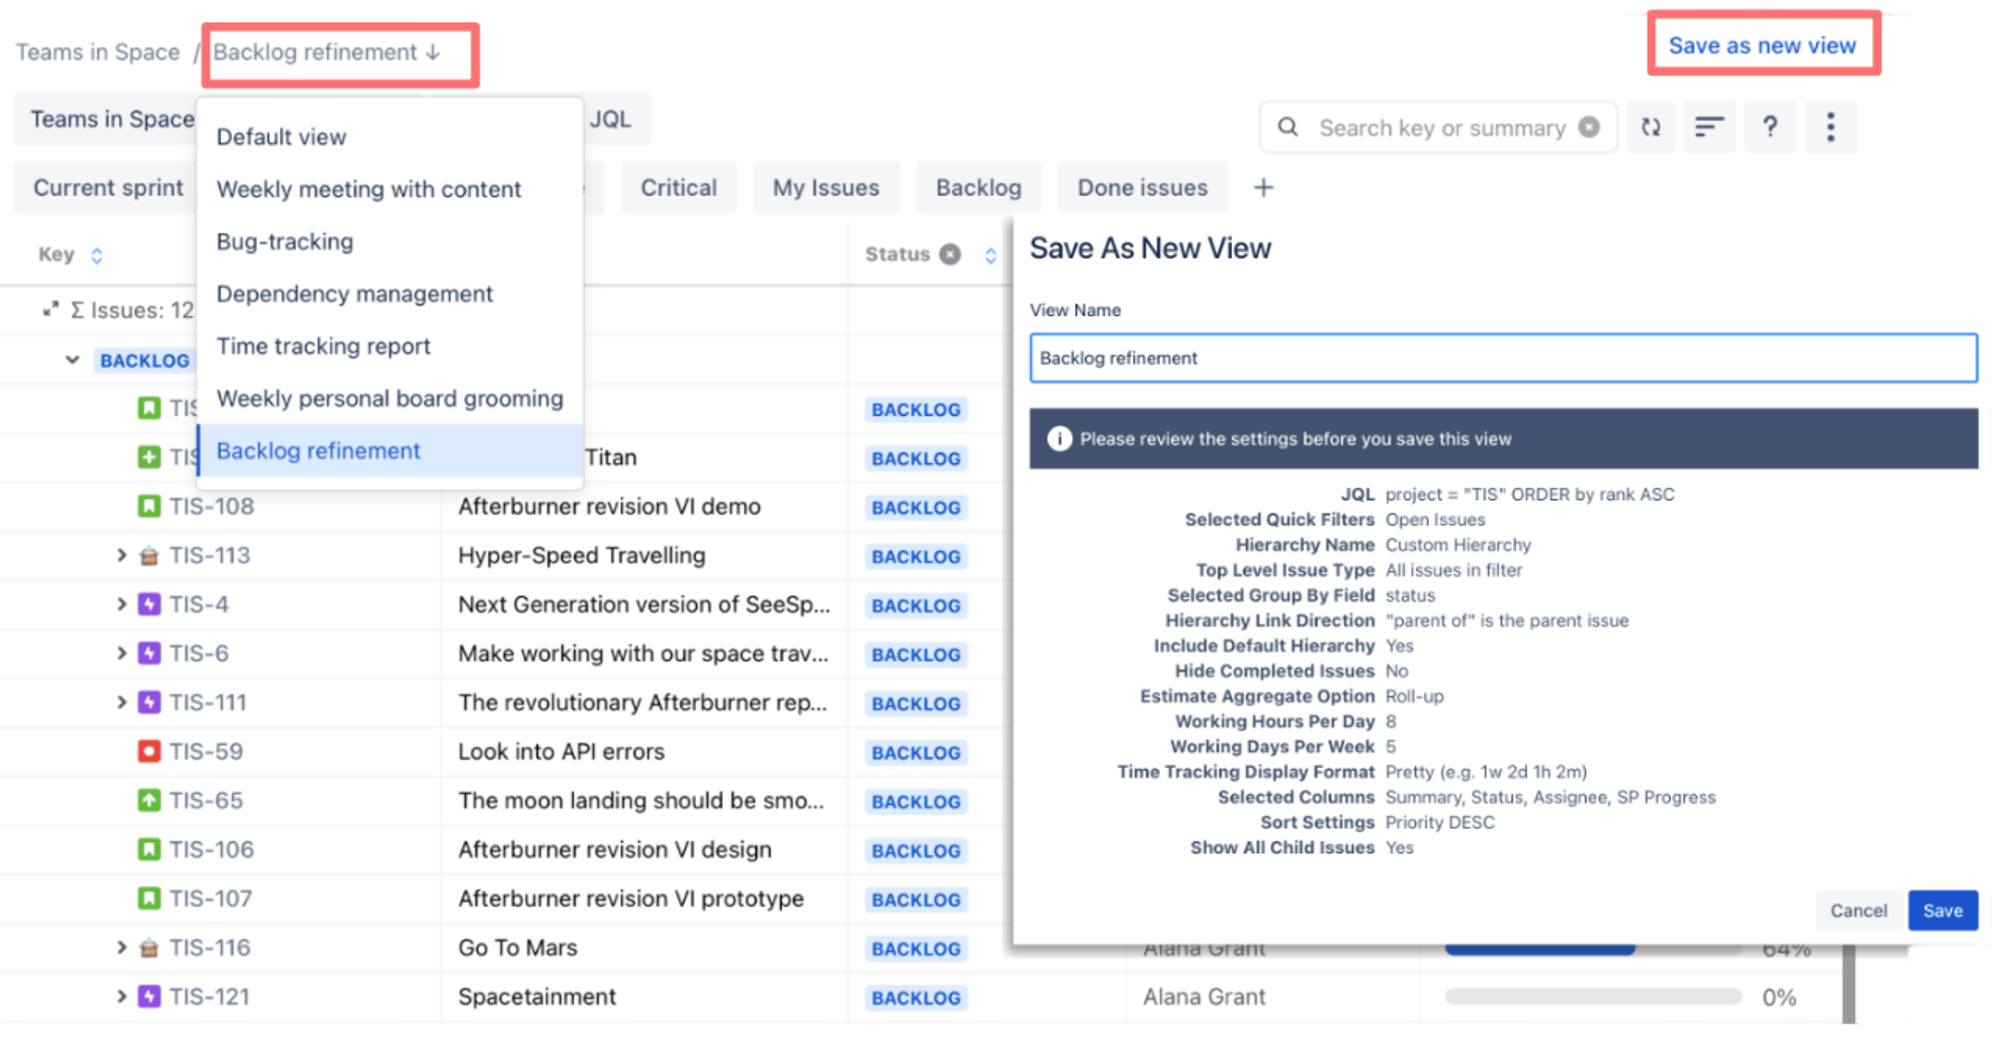
Build Saved Views including any key data you need.
You can create Saved Views based on any criteria and quickly navigate between them, making it easy to access the project information you need when you need it.
A hospital network rolling out a new patient-records system maps the work in Jira, mapping out the rollout by building, department, setup stage, and any other progress marker they care about. Using Hierarchy for Jira's Saved Views, all key stakeholders can stay up to date:
- Executives can track which locations are on schedule.
- Department heads can see the specific tasks their team need to complete.
- IT team members can monitor and resolve configuration issues.
Each stakeholder sees the data that matters to them and filters out the information they don't need to see.
Hierarchy for Jira updates your reports in real time, meaning you don't need to ping team members for updates and don't need to worry that you're sharing outdated information.
Thanks to a handy shareable link, it's easy to share your Saved Views with people outside of your direct team. You can also export your view to a CSV and share it via Google Sheets or Excel (all while maintaining your hierarchy levels in your export!).
6. Reduce your time spent on reporting with dynamically updating dashboards
Now that you've structured your hierarchy the way you need and have saved multiple views for different key stakeholders, it's time to start reporting on progress.
Hierarchy for Jira makes it easy.
First, you can freely customise the columns showing on your boards. Click '+' to add columns or 'x' to remove them.
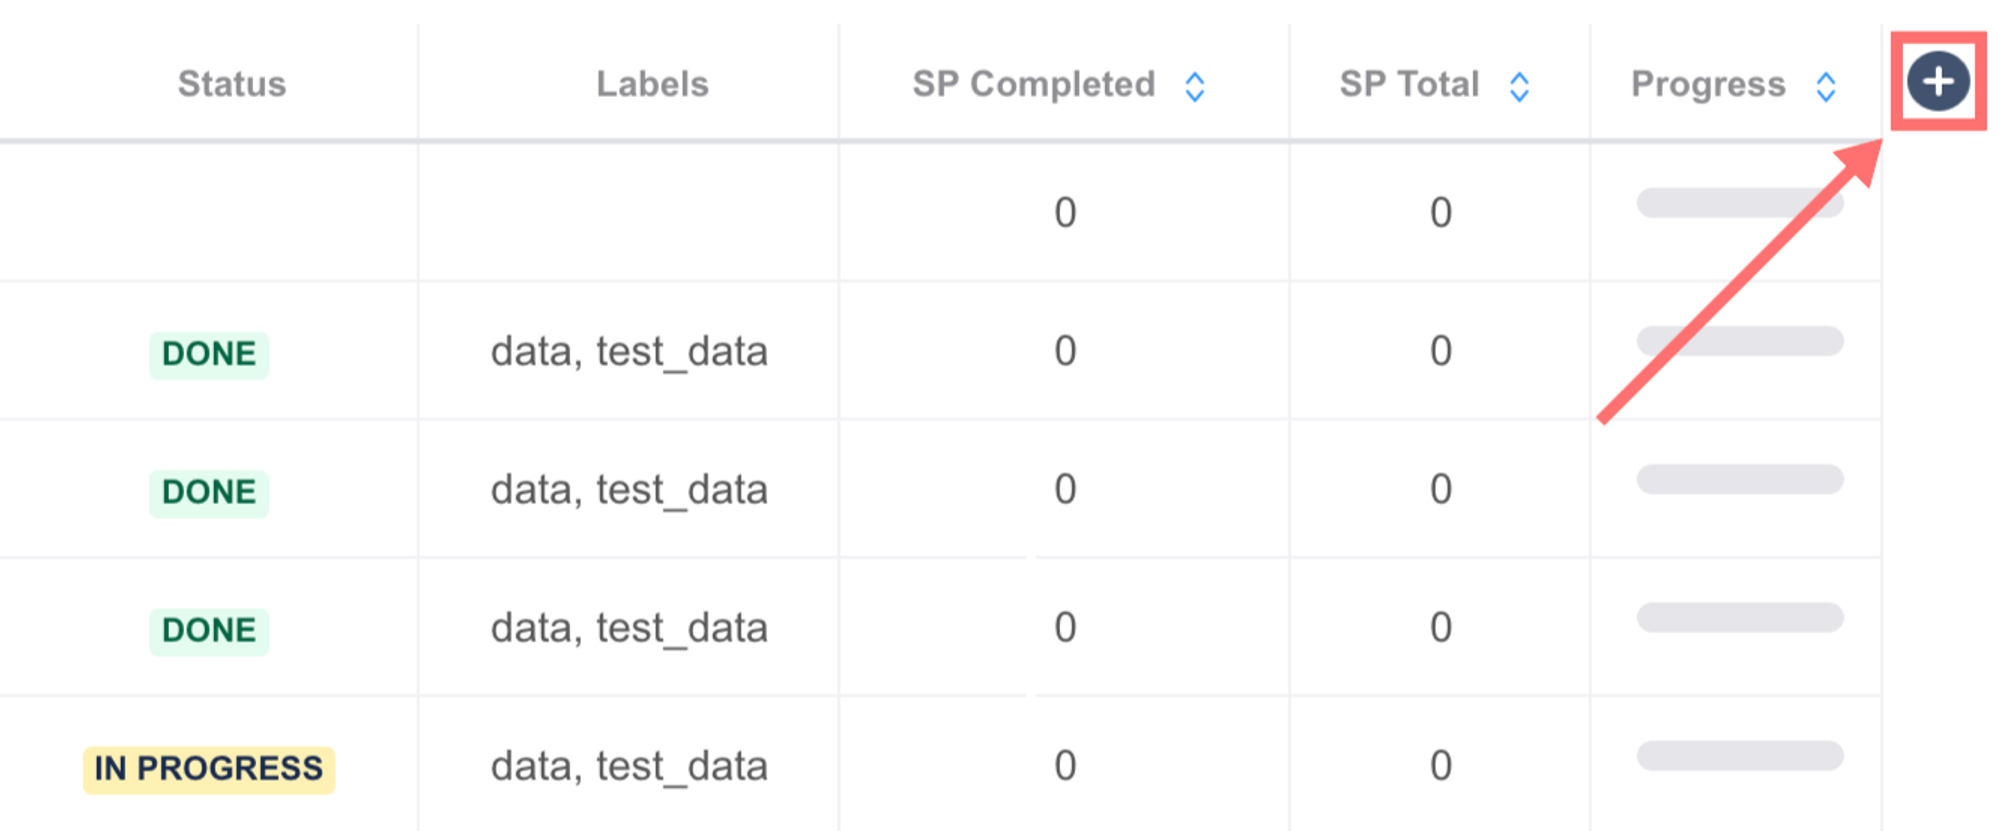
Add any project data point to your reports.
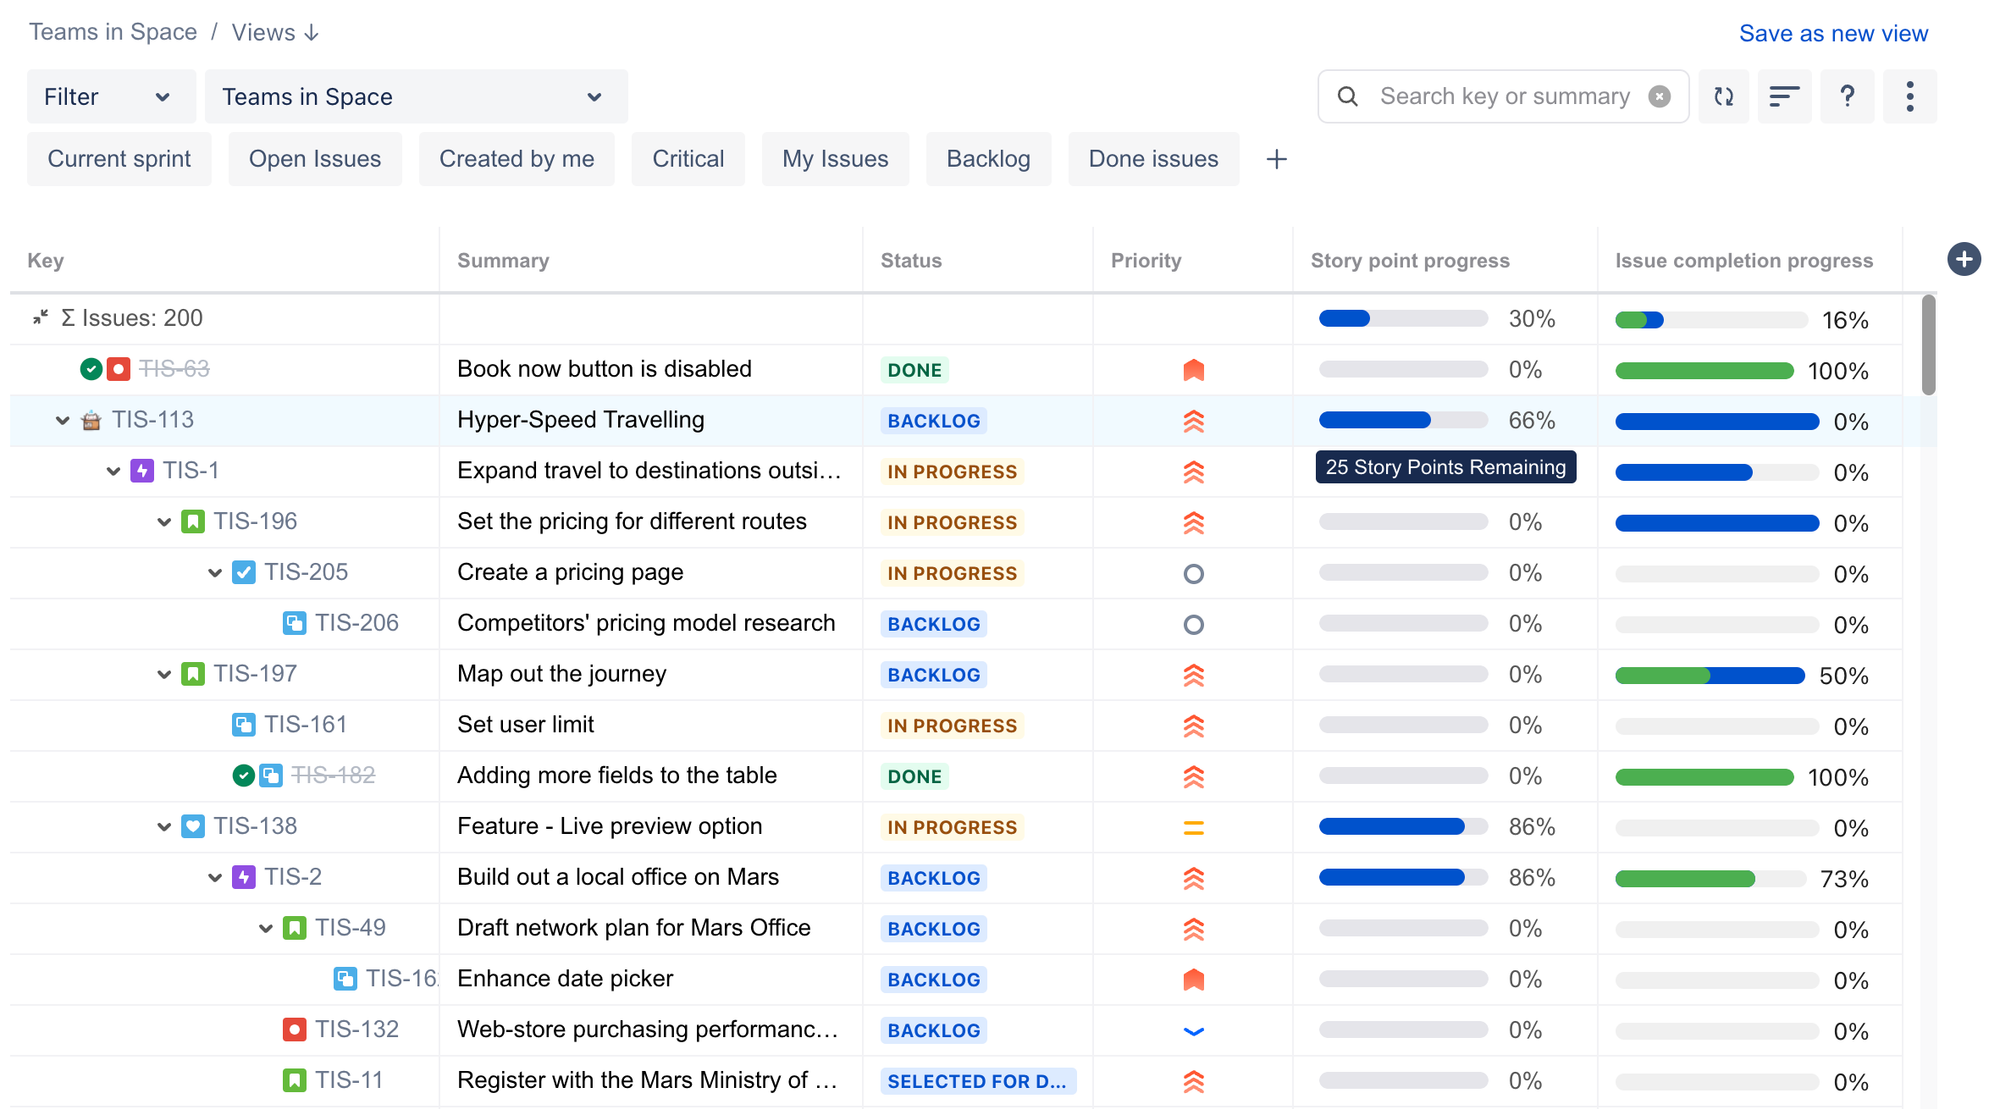
You can add a column for Story Points Completed, Story Points Total, Time Logged, Progress %, work items completed, or any other custom field that you use to measure progress.
Once your columns are set, you can roll up or sum up the data to get real numbers that you can use to report to your key stakeholders.
Stakeholders can self-serve updates whenever they want, reducing the "quick question, how's the project going?" interruptions.

Roll up or sum up any progress indicator in your project
Your progress bars update automatically, and you can use them to quickly get an overview of how close you are to project completion.
Once the columns and required roll or sum-ups are set, each Saved View turns into a live report. Open the view or share its link, and everyone sees up‑to‑date totals and progress bars at a glance. No more copy-pasting or data-wrangling for external stakeholders. You'll see precise numbers that tell you exactly how close you are to the finish line.
Need to share a more visual report with leadership? You can switch to the timeline tab, which lets you generate a shareable URL or export a PNG snapshot of your project schedule.
Key takeaways
Your Jira projects shouldn't force‑fit into someone else's structure. With Hierarchy for Jira, you can shape your work item structure around the way your teams actually plan, build and deliver.
Here's how to put this guide into practice right now:
- Link a handful of your work items together: whether you want to add levels above, between, or below epics, link your work items together in the way you see fit. You may have already linked your items together. If so, skip this step!
- Install Hierarchy for Jira and start your free 30‑day trial: you'll have a risk‑free trial to experiment with your new hierarchy, ready in minutes!
- Open the tree view: in seconds, your customised hierarchy of work items will be ready to view, structured based on how your work items are linked together.
- Save different views: build custom views and save them for product managers, execs or the development team, so everyone sees the data that matters to them.
- Stay on track with powerful reporting: create always-up-to-date reports thanks to powerful rollups and sum-ups that aggregate key project data and turn it into actionable progress tracking reports.
Once you've set up Hierarchy for Jira, muddled Jira workarounds will be a thing of the past. Your new custom structure will surface hidden dependencies, help you forecast with confidence, and keep stakeholders aligned without touching another manual report.
Ready to customise your Jira structure to fit the way your team really works?
Start your free 30-day trial of Hierarchy for Jira and instantly create a custom work type hierarchy structured to fit your team's real project management needs. Have any questions? We're here to help!


Written by
Jira
Project Management